
Engine Break In |
One of the hottest topics around, the proper way to run
in an engine. Basically, you have 2 choices when it comes to running in an
engine. Break in the motor the way the manual suggests which guarantees
the best longevity, but not possibly the the best horsepower. Or, you can
run in your motor the way many race teams and tuners suggest. I have owned
5 new bikes and have always run in the motor the way the manual suggests.
However, IN MY OPINION, I believe the manufacturers recommendations are mostly to keep us from getting
on our new bikes and running them too hard before we are used to them. I
am considering altering my previous break in strategy for this particular method.
Keep in mind, this is not what the manufacturer suggests and my opinion
is only worth about 2 cents...if that. Step by Step... While running in your engine, you should always vary the RPM's, this loads and unloads both sides of the rings. This allows them to break in properly. Even manufacturers recommend loading and unloading the motor during break in. Always go on short trips, about 50 miles, and then park it for about 4 hours till the motor cools down completely. Run your motor under 50% of redline with no full throttle use for the first 100 miles. Then change the oil and filter, this will remove any debris in the oil....i.e. assembly lube, metal shavings, etc.... From 100 to 400 miles, progressively use more RPM's and throttle. Use short bursts of full throttle as you approach the 400 mile mark. Only use full throttle in the shorter gears, 1-4, no full throttle in 5th or 6th. From 400 to 600 miles, continue to vary the engine speed while riding, no long steady throttle operation. Continue to let your engine cool down fully after rides. Gradually increase the amount of high rpm and full throttle operation in gears 1-4. At the 600 mile mark, change the oil and filter. At this point you can ride normally, but try to avoid long highway trips till the 1000 mile mark. And remember, your engine will continue to break in till well after 2000 miles, although to a lesser extent. Do not use synthetic oil till at least the 3000 mile mark. Keep in mind this technique is not what the manufacturer recommends and may render
your warranty void. Use this method at your own risk. |
Suspension Setup and Info |
This section will give a very basic description on suspension
setup. Keep in mind the information below is in very General Terms. Suspension is very complex and would involve a short novel to completely
explain. With that in mind, on the street there is no "Perfect" setup.
The road surfaces we encounter vary in quality. Some roads are very smooth,
others are not. Therefore, setting up your suspension has to be a
compromise. Set it up for the smooth roads, then your bike will wallow at
speed on the rough roads. Set your suspension up for the bumpy roads, and
you'll have a less compliant ride on the smoother roads. It's all up to
the rider what he/she prefers to deal with on a daily basis. Below, I hope
to provide a good understanding of setting up your bikes suspension. Everything
from setting the preload, to adjusting those dampening forces. First things First.....Setting the Preload. Preload on the springs is very important, because it affects the height of the motorcycle and the fork angle. Consequently, handling characteristics can be changed, even negatively. This is much easier if you have a friend help. Place the motorcycle on a flat surface. Lift up the rear of the motorcycle to a fully extended position. Take a measurement from the rear axle to a point directly above. Use a piece of tape to mark your upper measuring point, you'll need that for later use. Do the same with the forks, have your friend fully extend your forks and take a measurement from your front axle to the bottom of the outer fork tube. Next, the owner of the bike should gear up in his/her usual riding gear. Sit on the bike in a normal riding position so your weight is distributed on the suspension the way it will be when riding. Have your friend take a measurement on the front and the rear from the EXACT same measuring points as used before. The front should sag about 35-48mm. The rear should sag about 30-40mm. If your suspension doesn't meet these standards, you'll need to adjust your preload. |

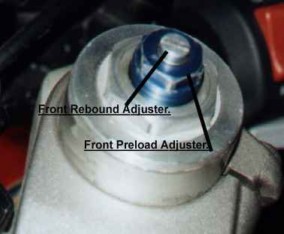
At the front, on top of the fork tube, you'll see a large nut with a flat tip screw in the top.
The large nut is for your preload adjustment on your front forks.
The preload adjuster is all we are concerned with at this time. On the side
of the preload adjuster, you'll find some reference lines, use these to insure
your preload is adjusted equally on both forks. BOTH FORKS MUST BE ADJUSTED EQUALLY. Screw the adjuster clockwise to add more preload, |
counterclockwise to remove preload. Make the necessary adjustments until fork
preload is 35-48mm with the rider and gear on board. |

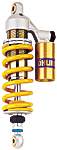
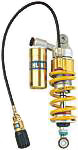
At the rear, your preload adjustment is a big spanner nut located
towards the top of the rear shock. You'll see 2 spanner nuts. Loosen
the top nut, it's the locking nut to ensure you adjustment stays where you
set it. Use the lower spanner nut to adjust your preload. Once again,
clockwise to add preload, counterclockwise to remove preload. Your preload
should be about 30-40mm with rider and gear on board. Don't forget
to retighten the top spanner nut. |
Once you are certain your preload on the front and rear are correctly set, you can
move on to the Rebound and Compression Adjustments. |
Rebound & Compression |

Rebound & Compression adjusters use fluid to control the speed
at which your suspension can compress or extend. Without this, your bike
would be like and old Caddy with worn out shocks, you'd hit a bump and your bike
would pogo forever. Rebound and Compression are what prevents your suspension
from Old Caddy Syndrome. Rebound has a greater effect on overall
handling than Compression. However, both are equally important and must work
together. |
At the front, remember those flat tip screws on top of the fork
leg? That is your rebound adjuster for your forks. Usually these
are adjusted by clicks. Turn the rebound adjuster clockwise for more rebound
dampening, counterclockwise for less rebound dampening. Once again, both
forks must be adjusted equally for proper performance. |
Compression adjustment is usually made at the bottom of the fork
leg, adjustments are made by turning the screw clockwise for more compression
dampening, counterclockwise for less compression dampening. These adjustments
are made in clicks. |
tech tips |
At the rear, the rebound adjuster is located at the bottom of
the shock, and the compression is adjusted at the top of the shock. Both
are usually adjusted by a flat tip screw using clicks. However, some shocks
have a remote knob to adjust compression dampening. Usually only aftermarket
shocks have this feature. Once again, clockwise for more compression
dampening, counterclockwise for less. |
So what setting should I use for my Rebound and Compression? |
In very General Terms, if your bike feels bouncy when going over
bumps (pogoing), your rebound may be set too low. There is not enough
fluid resistance to control the spring. If your bike feels hard and bumpy,
especially over a series of bumps, your rebound dampening may be set to high,
too much fluid resistance doesn't allow the spring to fully extend before the
next bump. Compression is a little easier. Start with your compression on the soft side. Increase your compression dampening in small increments until your bike feels harsh over bumps (doesn't want to absorb bumps), then back off your compression dampening a few clicks. Keep in mind, with a variety of road conditions you're suspension will never be perfect. Get your preload set for your weight with riding gear on. Then set your rebound and compression so your bikes' suspension is compliant. From this point you can customize your setup for your own particular preferences. I usually set my suspension up so that it's compliant but firm, just in case a good set of twisties comes along! |
Coming Soon.....Chain Care and Maintenance!!! |
Tech Tips |